

Views: 0 Author: Site Editor Publish Time: 2026-11-10 Origin: Site


You drill a perfectly straight hole. You insert a standard wedge anchor. The moment you apply torque, the brick shatters. The anchor spins uselessly in the dust. Securing heavy loads to crumbling masonry is incredibly frustrating. Standard fasteners continually fail in soft brick walls because they create intense pressure at a single point.
Enter the hero of soft masonry fastening. Widely recognized in commercial supply chains as a Double Tube Mechanical Anchor, this specialized hardware is engineered to solve the exact problem of brittle substrates. Unlike standard friction anchors, these unique fasteners expand along their entire length. They provide a steadfast grip even in base materials of highly questionable strength.
In this comprehensive guide, we will explore exactly what these fasteners are and the mechanical physics behind how they work. We will also provide a foolproof, step-by-step tutorial on safe deployment for your next project.
Key Takeaways
Full-Length Grip: Double expansion anchors feature a unique dual-tube design. They expand at both ends simultaneously to maximize contact and grip in suspect masonry.
Versatile Base Materials: They serve as the optimal engineering choice for soft brick, hollow block, and older concrete where standard wedge anchors typically pull out.
Machine Bolt Compatibility: These anchors require standard machine-threaded bolts. This allows fixtures to be removed, adjusted, and replaced without losing the embedded anchor.
Precision Installation: Successful deployment relies heavily on drilling the exact specified hole size and thoroughly extracting masonry dust prior to insertion.
A double expansion anchor is a heavy-duty, female-threaded masonry fastener. Engineers design it specifically for base materials of inconsistent or low compressive strength. Standard fasteners rely on a single point of friction to hold weight. In contrast, this anchor distributes holding power across a much larger surface area.
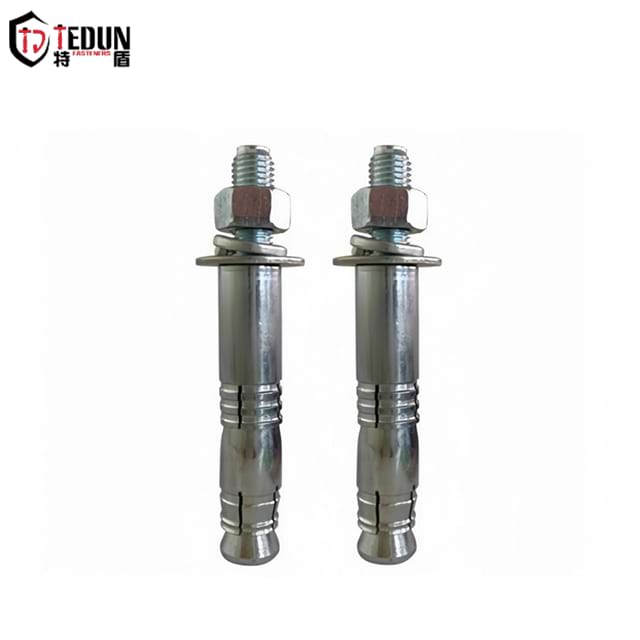
The mechanism gets its double tube moniker from its distinct physical anatomy. The anchor consists of two tubular shield halves held firmly together by a durable spring band. Inside these protective shields are two internally threaded wedge nuts, frequently referred to as cone nuts. These sit positioned at opposite ends of the anchor body.
Regarding material composition, top-tier manufacturers cast these anchors from Zamac. This is a highly durable zinc alloy. Zamac is inherently rust-resistant and immune to typical corrosive elements found in masonry environments. Furthermore, this metallurgical profile ensures the anchor maintains its structural integrity over time. It is highly suitable for both dry indoor applications and demanding outdoor environments exposed to moisture. Standard trade sizes typically range from 1/4-inch up to 3/4-inch internal thread diameters to accommodate various load requirements.
The primary advantage of this fastener lies in the physics of its expansion mechanics. Understanding how the anchor operates internally is crucial for a safe installation. This is especially true when you are perched on scaffolding trying to mount a heavy industrial bracket.
Thread a standard machine bolt into the anchor and apply rotational torque. This mechanical action instantly triggers a dual-wedge system. Specifically, the turning bolt pulls the bottom cone nut upward toward the surface. Simultaneously, it pushes the top cone nut downward.
This simultaneous dual-action forces the two tubular shield halves to expand outward parallel to the drilled hole. Traditional wedge anchors expand in a V shape. The heavy-duty double tube mechanical anchor expands cylindrically.
This parallel expansion is critical for structural safety. It distributes the mechanical load and radial expansion forces evenly across the entire depth of the masonry. By avoiding point stress, which is a localized concentration of force, the anchor prevents soft brick or aged mortar from fracturing under pressure. Consequently, the parallel load distribution makes this specific anchor type vastly superior for materials lacking high compressive strength.
Recent industry analyses and construction safety reports highlight a significant shift in how contractors approach aging infrastructure. Urban renovation projects are increasing globally. Construction professionals frequently encounter century-old brickwork and degrading mortar joints. Consequently, reliance on traditional wedge anchors is rapidly declining for these specific retrofits.
Engineers are increasingly specifying full-length expansion solutions to mitigate the risks of substrate blowout and liability. Stricter building codes now demand predictable load distribution in unpredictable materials. This has driven a notable surge in demand for specialized masonry hardware. This trend underscores a broader industry movement toward material-specific fastening technologies. The construction sector is finally moving away from the outdated, one-size-fits-all approach to structural anchoring.
Selecting the correct anchor for the specific base material is a fundamental principle of structural safety. Double expansion anchors are not universally required for all concrete. However, they absolutely excel in environments where other anchors fail.
Best Base Materials:
Soft or Hollow Brick: Older brickwork often lacks the density required for standard friction anchors to bite into safely.
Cinder Block and Concrete Block: The parallel expansion grips the webbed sections of blocks. It does this without causing the brittle outer concrete shell to shatter.
Older, Deteriorating Concrete: Concrete that has become porous or crumbly over decades requires full-length expansion to secure a load effectively.
Mortar Joints: Drilling directly into the masonry unit is always preferred for maximum load capacity. Still, double expansion anchors can securely grip mortar joints if unavoidable.
Common Industrial and Commercial Use Cases:
Mounting heavy electrical junction boxes, transformers, or conduit routing on aged brick facades.
Securing safety handrails, industrial shelving, and heavy-duty racking in warehouses featuring older concrete floors.
Installing structural awnings, hurricane shutters, or heavy commercial signage.
Because the anchor utilizes a removable machine bolt rather than a fixed threaded stud, it is the ideal choice for temporary installations. It is perfect for industrial equipment that requires routine maintenance and periodic removal.
Proper preparation and the use of correct tooling are non-negotiable for achieving the rated holding power. Before beginning the installation process, ensure you have the following equipment readily available on site.
The Right Anchor: Select the specific internal thread size of the anchor required for your project load.
Machine Bolts: You must supply your own machine-threaded bolts. To calculate the correct bolt length, add the thickness of the fixture being mounted to the total length of the anchor.
Hammer Drill: A standard rotary drill is insufficient for masonry. A hammer drill is required to pulverize the masonry effectively without overheating the drill bit.
Carbide-Tipped Masonry Bit: The drill bit must meet ANSI standards. The bit size must match the outside diameter of the anchor body, not the internal bolt size. For instance, a 3/8-inch anchor typically requires a 5/8-inch drill bit.
Hole Cleaning Tools: Bring a stiff wire brush, a compressed air nozzle, or a HEPA-filtered vacuum to extract silica dust.
Hand Tools: You will need a standard hammer for tapping the anchor into place. Bring a calibrated torque wrench or standard socket set for tightening the bolt. Safety goggles and a particulate respirator mask are also strongly recommended.
The holding capacity of any mechanical anchor is only as reliable as the quality of its installation. Follow these objective, step-by-step procedures to ensure a secure and compliant fastening.
First, consult the manufacturer technical specifications to identify the exact outside diameter of the anchor. The diameter of the drilled hole must match this outside dimension perfectly. This ensures the shields engage the masonry immediately upon expansion. Next, determine the depth. Drill the hole equal to, or slightly deeper than, the total length of the anchor. A hole that is too shallow will prevent the anchor from sitting flush. A slightly deeper hole provides a small reservoir for any residual dust that cannot be extracted.
Equip your hammer drill with the correctly sized carbide-tipped masonry bit. Don your safety goggles and respirator mask. Position the drill bit exactly perpendicular to the base material at a 90-degree angle. Apply steady, moderate pressure and allow the hammer mechanism to do the heavy lifting. It is critical to keep the drill perfectly straight during this process. Wobbling or reaming the drill bit will create an oval-shaped hole. This severely reduces frictional holding power.
This step is structurally critical and must never be skipped. Drilling into masonry generates fine silica dust. If left inside the hole, this dust acts as a dry lubricant. It prevents the metal shields from gripping the rough walls of the masonry.
Utilize the standard Blow-Brush-Blow method. Use compressed air or a vacuum to remove the initial loose dust. Insert a wire hole-brush and scrub the interior walls vigorously to loosen caked-on debris. Finally, apply compressed air or a vacuum a second time to extract the remaining particulate matter until the cavity is completely clear.
Take the hardware and begin inserting the double tube mechanical fastener into the cleaned cavity. The end with the internally threaded cone nut should go in first. The fit should be relatively snug. If necessary, use a hammer to tap the anchor gently into the hole. Strike it squarely to avoid damaging the internal threads. Continue tapping until the top rim of the anchor is entirely flush with the surface of the base material.
Move your fixture into position. Align its mounting hole directly over the embedded anchor. Take your pre-measured machine bolt. Ensure a flat washer is placed onto the bolt first to distribute the clamping force. Pass it through the fixture. Thread the bolt into the anchor by hand for the first few turns. Hand-threading ensures the bolt catches the internal cone nut threads properly without cross-threading.
Using a wrench or socket set, begin tightening the machine bolt. As you turn the bolt, you will physically feel the resistance increase. The internal cones draw together and force the shields outward against the masonry. Exercise caution to avoid over-tightening. Applying excessive torque can strip the internal threads of the Zamac cone nuts. It can also exert too much radial force, cracking the base material. Generally, three to five full turns past the point of hand-tightness is sufficient to achieve full expansion and secure the load safely.
When sourcing masonry fasteners, buyers frequently encounter both single and double expansion variants. Understanding the distinction is vital for structural integrity.
Single expansion anchors feature a single cone nut at the base. When tightened, only the bottom half of the anchor expands. This localized expansion is highly effective in hard, solid concrete. The base material possesses the compressive strength to withstand concentrated point stress without blowing out.
Double expansion anchors expand along their entire cylindrical length. This design mitigates localized stress by spreading the expansion force over a much wider surface area.
The decision relies entirely on the base material. If you are drilling into cured, hard, solid concrete, single expansion anchors are highly efficient. However, if the base material is soft brick, hollow block, crumbly, or of unknown structural density, the double expansion anchor is the prudent, engineering-backed choice to prevent material failure.
Mechanical expansion fasteners provide exceptional anchoring capacity. However, their reliability depends entirely on adherence to strict installation tolerances. In masonry, structural integrity is governed by friction, radial pressure distribution, and base material shear strength. Subtle deviations during the drilling, cleaning, or torquing phases can significantly reduce tensile pull-out values. They can even cause catastrophic substrate fracturing.
Understanding the root mechanical causes of installation failure allows engineers, contractors, and maintenance professionals to prevent costly anchoring re-work and structural liabilities.
A frequent and severe error during installation is utilizing an improper drill bit diameter. The dual-expanding shields rely on a precise clearance fit before expansion. If the drilled hole is even slightly too wide, the expanding shields cannot contact the internal sidewalls with adequate normal force. When tightening torque is applied, the internal cones will simply rotate with the bolt. They might strip the zinc-alloy internal threads instead of biting into the masonry. Always use ANSI-compliant carbide-tipped drill bits that precisely match the external diameter of the anchor shield.
Drilling into dense concrete or brick produces fine particulate dust and loose aggregates. Leaving this debris inside the drilled cavity represents a major failure mode. It severely degrades pull-out resistance. The particulate layer acts as a dry lubricant, drastically reducing the coefficient of static friction. Furthermore, masonry slurry can pack beneath the internal cone nut. This prevents it from traveling its full axial distance along the bolt threads.
Selecting an incorrect bolt length undermines the dual-expansion mechanism. Because the system features two independent conical nuts, the machine bolt must engage the entire assembly correctly.
Minimum Bolt Length equals Fixture Thickness plus Washer Thickness plus Anchor Body Length.
If the machine bolt is too short, its threads only engage the upper cone nut. Tightening the bolt pulls only the upper cone downward, creating severe point stress near the surface. Conversely, if the bolt is too long, it may bottom out against the blind end of the drilled hole before the fixture is clamped firmly against the substrate.
Applying excessive torque during final tightening is a destructive error. This is particularly true in low-density brick, lightweight cinder block, or historic lime-based mortar. The dual-action geometry converts axial bolt tension into massive outward radial pressure. Exceeding manufacturer torque limits will cause radial tensile stresses to exceed the tensile capacity of weak masonry. This leads to visible cracking or cone pull-through. Always use a calibrated manual torque wrench rather than high-torque pneumatic impact drivers.
Installation Defect | Mechanical Failure Mode | Physical Indication on Site | Corrective & Preventive Action |
|---|---|---|---|
Oversized Borehole | Inadequate normal friction causing cone spin | Anchor rotates freely with the bolt; zero torque resistance | Discard hole. Drill a new hole using a calibrated ANSI carbide masonry bit. |
Residual Drill Dust | Interfacial slip restricting lower cone movement | Anchor slips under working load; fixture loosens over time | Clean hole thoroughly using the standard Blow-Brush-Blow methodology. |
Short Machine Bolt | Incomplete lower cone travel causing single-point expansion | Surface spalling; pull-out failure at loads well below rating | Calculate bolt length properly. Include fixture, washer, and anchor length. |
Excessive Tightening Torque | Cone pull-through causing substrate radial fracturing | Cracks visible across masonry; bolt spins after initial resistance | Use a manual torque wrench. Strictly observe engineering torque thresholds. |
The machine bolt and mounted fixture can be removed, inspected, serviced, or re-installed as often as needed without disturbing the anchoring system. However, the internal zinc-alloy shield and expanding cones cannot be removed once fully set into the masonry. The mechanical shields undergo plastic deformation and firmly interlock with the borehole wall. Attempting to pull them out will severely damage the surrounding brick, block, or concrete. If an anchor is no longer needed, back out the machine bolt completely, drive the expanded shield deeper into the borehole with a punch, and seal the surface with structural patching mortar.
Double expansion anchors utilize internal National Coarse machine threads. The designated anchor trade size denotes the inner thread diameter, not the outside diameter of the hole. For example, a 3/8-inch double expansion anchor requires a standard 3/8-16 machine bolt. The outside diameter of the shield is larger and requires a 5/8-inch drill bit. To determine the necessary bolt length, sum the total thickness of the fixture to be mounted, the thickness of any flat washers, and the overall length of the anchor body.
Holding capacity depends directly on the anchor diameter, embedment depth, and the compressive strength of the base material. Always consult the manufacturer technical data sheet for specific shear and pull-out load capacities. For life-safety and structural engineering calculations, always apply an industry-standard safety factor of four to one. This means the working load limit is set to a maximum of 25 percent of the ultimate tested pull-out capacity under static conditions. Use an eight to one ratio where dynamic vibration or shock loads are present.
While you can technically drill into very soft brick with a standard drill and a masonry bit, a rotary hammer drill equipped with a high-grade carbide masonry bit is strongly recommended. Standard rotary-only drills generate excessive friction without the percussive impact needed to fracture masonry aggregate efficiently. This can overheat the bit, prolong drill times, and produce out-of-round holes that compromise anchor grip.
To maintain design holding values and prevent overlapping shear stress cones within the masonry, maintain a center-to-center anchor spacing of at least ten anchor diameters. Edge distance is the measurement from the center of the drilled hole to the nearest free edge or unsupported corner of the masonry unit. This must be a minimum of five anchor diameters.
Double expansion anchors function effectively in both solid brick and the solid face shells of hollow Concrete Masonry Units. Wedge anchors exert concentrated point loads that fracture the thin walls of hollow blocks. In contrast, the double-tube design spreads mechanical expansion pressure across its entire surface area. Just verify that the anchor length does not exceed the thickness of the block wall face shell.
Mechanical expansion anchors that rely on friction in tension are generally not recommended for sustained overhead suspension of heavy structural loads. This is especially true where fire-life-safety considerations apply. In high-temperature fire situations, zinc alloys can lose structural yield strength, presenting an anchor pull-out hazard. Always consult local building codes and structural engineering specifications before specifying friction-based fasteners overhead.
Standard Grade 2 or Grade 5 carbon steel machine bolts are well-suited for general commercial indoor installations. Using high-hardness Grade 8 structural bolts is unnecessary. The ultimate failure mode in soft brick or masonry will almost always be substrate failure or shield thread stripping, rather than tensile bolt yield. For exterior installations subject to moisture, specify hot-dip galvanized Grade 5 bolts or austenitic stainless steel bolts to prevent corrosion-induced binding.
The embedment depth must be at least equal to the total length of the anchor body. The top rim of the anchor shield must sit perfectly flush with the surface of the base material. Sinking the anchor too deep makes it difficult for the machine bolt threads to catch the bottom cone nut. Leaving it protruding above the surface prevents the fixture from clamping tightly against the masonry.
No. Double expansion anchors are strictly designed for masonry, concrete, brick, and block. They require a solid, rigid sidewall to push against to generate friction. Drywall and plaster are too soft and thin. The expansion force will simply crush the gypsum core and tear through the paper backing, resulting in immediate failure. For drywall, use toggle bolts or heavy-duty hollow wall anchors instead.
Securing heavy fixtures to compromised or aging masonry does not have to be a structural liability. Double expansion anchors serve as a highly reliable, engineered solution when dealing with soft brick, hollow block, or unpredictable concrete. By utilizing a parallel expansion mechanism, they distribute mechanical loads safely. They prevent the cracking associated with standard point-stress fasteners.
The ultimate success and safety of your installation come down to strict adherence to procedure. Ensure precise drill bit sizing, perfectly perpendicular drilling, and rigorous hole cleaning. Match bolt lengths carefully to prevent unexpected structural failures.
For your next commercial or heavy-duty residential project, prioritize safety and structural integrity. We encourage you to review Tedun Fasteners' double tube mechanical anchors. Source high-quality anchoring hardware manufactured to strict industrial tolerances. Pair them with properly sized ANSI-compliant carbide masonry bits to guarantee a secure and lasting hold.